In order to use the CallSights for Teams client an End User company will need to configure the following services in their Azure and Teams environments:
- Create an App Registration
- Create an Azure Bot
- Create a Teams Identity and Compliance Policy
- Apply the policy to a user or multiple users
Some of these steps may require a reasonably advanced level of experience as a Teams Administrator. They require access to the Azure Portal and PowerShell. If you prefer, you can perform these steps with us. Please Contact Us to arrange a convenient time.
1. Creating an App Registration
An App Registration creates an App Instance that can have permissions applied to it. This allows the bot to communicate with and be installed in Microsoft Teams
- Navigate to App Registrations
- Click New Registration
- Provide a unique name for your App Registration e.g. CallSightsForTeams
- Choose Accounts in this organisation directory only (Single tenant) for the Supported Account type
- Click Register
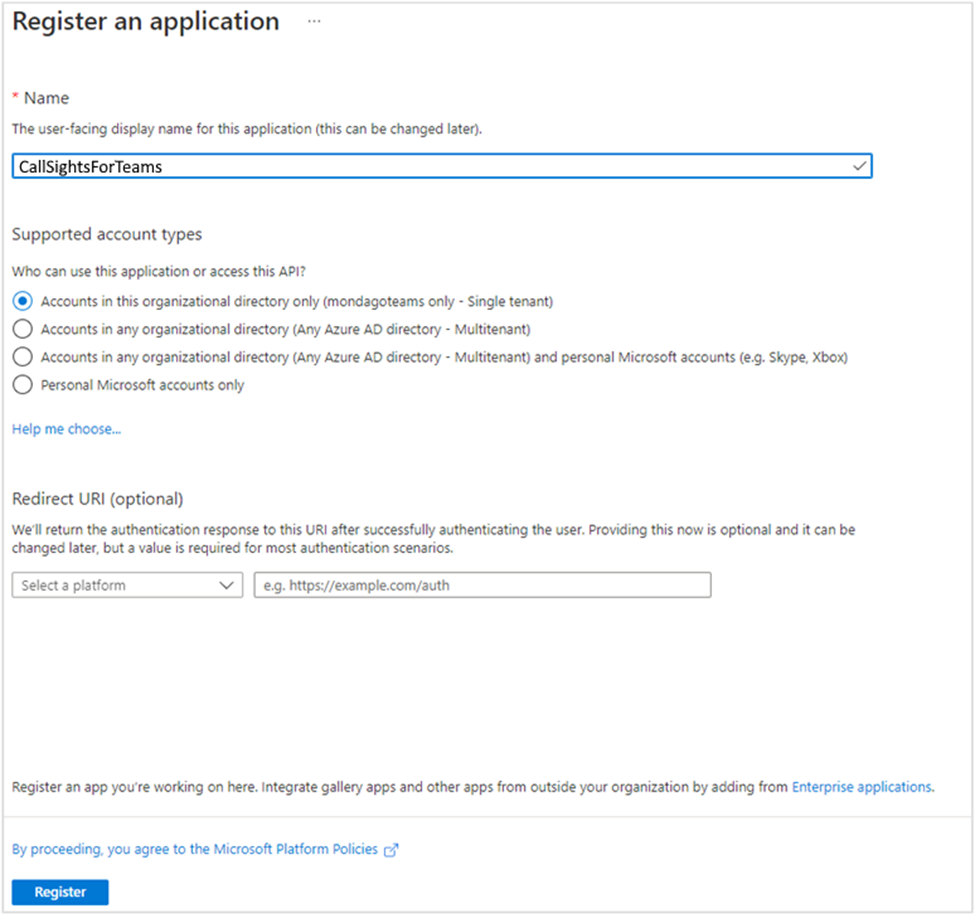
- Note the Application (client) ID and the Directory (tenant) ID
- Click Certificates & secrets
- Add a new client secret
- Give it a description of AppAccessKey or similar
- Choose an Expiry of 24 months
- Click Add

- Copy the Value of the secret now as it will not be available once leaving the page
- Click API Permissions
- Click Add a Permission
- Choose Microsoft Graph from the API List
- Choose Application permissions
- Filter for Calls and Expand the Calls list
- Tick Calls.AccessMedia.All, Calls.JoinGroupCall.All
- Choose Delegated permissions
- Filter for Directory and Expand the Directory list
- Tick Directory.Read.All
- Filter for Group and Expand the Group list
- Tick Group.ReadWrite.All
- Click Add permissions
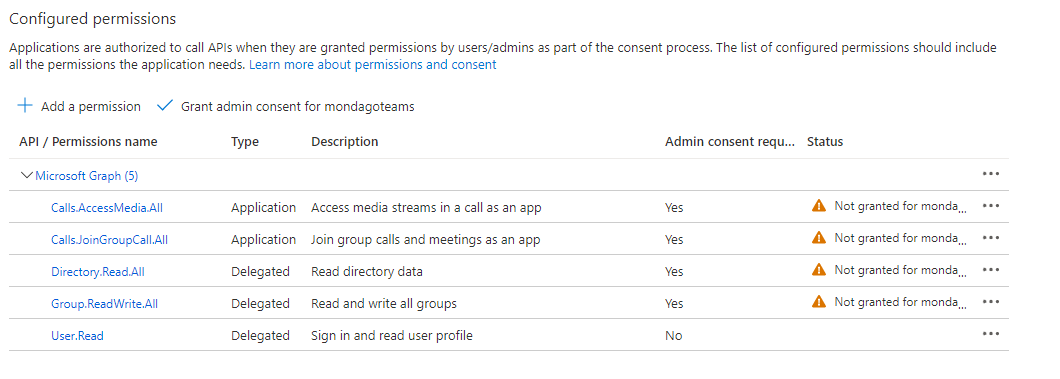
- Permissions should appear as above
- If you are the Teams Admin then click Grant admin consent…, if not then you will need to get the Teams Admin to do this.
Important: Give the Application Id, Tenant Id and Client Secret to the CallSights support department to allow them to complete the setup.
2. Creating an Azure Bot
This is required to provide a channel for sending Microsoft Teams events to the Bot.
- Navigate to Azure Bot in the Marketplace (type Azure Bot in the top search bar)
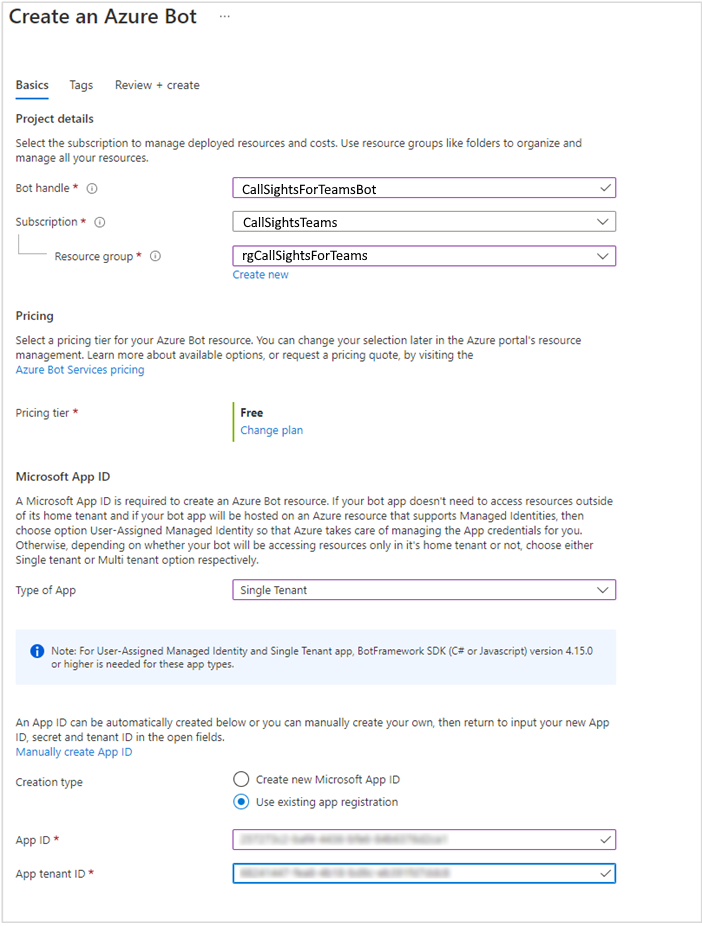
- Provide a suitable Bot handle: CallSightsForTeamsBot
- Choose subscription to add to
- Choose an existing resource group or create a new one
- Choose Data residency = Global
- Depending on throughput choose the appropriate Pricing Tier (Free or Standard)
- Change Type of App to Single Tenant
- Choose Use existing app registration for Creation type
- Enter the AppId of the previously created App Registration
- Enter the tenant Id of the previously created App Registration
- Review + Create, then Create
- After creating the Bot, choose “Go to resource”
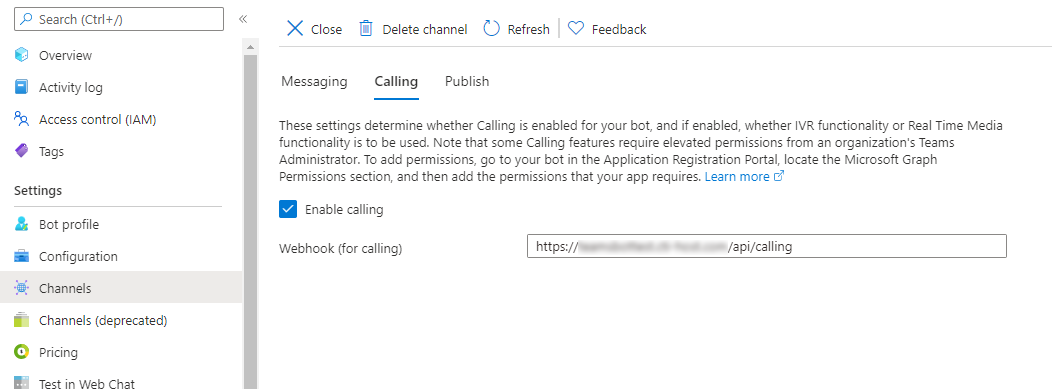
- Click Channels from Sidebar menu
- Choose Microsoft Teams from the list of Available Channels
- Agree to Terms of Service
- Click Calling tab
- Enable Calling
- In Webhook enter the provided DNS domain plus /api/calling: https://teamsbot.callsights.com/api/calling
- Click Apply
3. Creating a Teams Identity and Compliance Policy
Create an application instance in Azure Active Directory and link it to the App Registration – this can only be done via Powershell.
Import-Module -Name MicrosoftTeams -RequiredVersion 5.2.0
#Create Compliance Policy
#The botname (below) needs to be unique so adding your company name should be sufficient
$botName = "CallSightsForTeams.<UniqueCompanyName>"
#Connect to Azure to get App Id, and create Teams session using credentials interactively
Connect-AzAccount
$azureADApp = Get-AzADApplication -Filter "DisplayName eq '$($botName)'"
$tenant = Connect-MicrosoftTeams
#create inputs to Policy creation using domain name
$domainName = ($tenant.Account.Id).split("@")[1]
$domainTitle = (Get-Culture).TextInfo.ToTitleCase($domainName.split(".")[0].ToLower())
# Identity for the Bot
$identityPrincipalName = $domainTitle + "TeamsBot@" + $domainName
$identityDisplayName = "CallSights For Teams Bot"
# Name and description of Compliance Policy
$PolicyDesc = "CallSights Call Recording Policy"
$PolicyName = "CallSightsForTeamsCallingPolicy"
#Create identity
New-CsOnlineApplicationInstance -UserPrincipalName $identityPrincipalName -DisplayName $identityDisplayName -ApplicationId $azureADApp.AppId
# Allow time for online application to be created
Start-Sleep -Seconds 15
#Get the ObjectID for the already registered Recording Bot
$onlineAppObjectID = Get-CsOnlineApplicationInstance | where-object {$_.DisplayName -eq $identityDisplayName} | Select-Object -ExpandProperty ObjectID
Sync-CsOnlineApplicationInstance -ObjectId $onlineAppObjectID
#Create a new Teams Compliance Recording Policy with a name TestTeamsComplianceRecording in the tenant
New-CsTeamsComplianceRecordingPolicy -Enabled $true -Description $PolicyDesc -Identity $PolicyName
#Get the ObjectID for the already registered Recording Bot
$onlineAppObjectID = Get-CsOnlineApplicationInstance | where-object {$_.DisplayName -eq $identityDisplayName} | Select-Object -ExpandProperty ObjectID
#Link Policy to Recording Bot
Set-CsTeamsComplianceRecordingPolicy -Identity $PolicyName -ComplianceRecordingApplications @(New-CsTeamsComplianceRecordingApplication -Parent $PolicyName -Id $onlineAppObjectID)
Disconnect-MicrosoftTeams
Disconnect-AzAccount
4. Apply the policy to a user or multiple users
This needs to be applied via Powershell.
$PolicyName = "CallSightsForTeamsCallingPolicy"
#CHANGE THIS TO ADD TO A PARTICULAR IDENTITY
$IdentitytoAdd = "test.person@example.com"
Connect-MicrosoftTeams
# this can be run without the variables just replace them with actual values as required
Grant-CsTeamsComplianceRecordingPolicy -Identity $IdentitytoAdd -PolicyName $PolicyName
Disconnect-MicrosoftTeams
Was this article helpful?
That’s Great!
Thank you for your feedback
Sorry! We couldn't be helpful
Thank you for your feedback
Feedback sent
We appreciate your effort and will try to fix the article